Fruits, vegetables, beans, and lean proteins are essential to any healthy diet. When it comes to nutrition, all forms count!
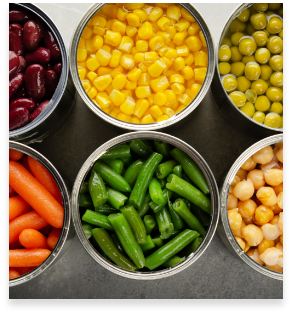
Canned foods are always in season, making healthy eating both easy and budget-friendly.
Canned beans, fish, and meat offer quick, affordable sources of protein and other important nutrients. Plus, there’s no cleaning, chopping, peeling, or soaking required, so canned foods are the ultimate convenience. Use them alone or combine them with fresh or frozen foods for a tasty snack or meal anytime.
Here are some ideas for nutritious and delicious meals using canned foods:
BEANS
Canned beans are low in fat, cholesterol-free, and packed with fiber. Just half a cup of beans provides 20-30% of your daily fiber needs, depending on the variety. Fiber is important for digestive health and helps you feel full longer.
Recipe Ideas
Chili Night Special: Combine one can of black beans, one can of kidney beans, and one can of diced tomatoes in a pot. Add ground turkey, chili powder, cumin, and garlic for a hearty, protein-packed chili.
Easy Bean Salad: Rinse and drain a can of chickpeas, then toss with chopped cucumber, cherry tomatoes, red onion, olive oil, and a splash of lemon juice for a refreshing side dish.
Diced Tomatoes
Just half a cup of canned diced tomatoes provides 20% of your daily vitamin C, which supports immune health. The canning process increases the antioxidant lycopene, which is known to benefit heart health.
Recipe Ideas
Quick Taco Topping: Top tacos or nachos with canned diced tomatoes and green chiles for added flavor without extra prep.
Tomato Basil Pasta: Sauté garlic in olive oil, add a can of diced tomatoes, and season with salt, pepper, and fresh basil. Toss with cooked spaghetti for an easy weeknight meal.
Peaches
Canned peaches are a nutritional surprise! They contain four times more vitamin C and ten times more folate than fresh peaches. Vitamin C supports skin health, and folate is essential for cell growth and repair.
Recipe Ideas
Peachy Smoothie: Freeze one can of sliced peaches in juice. Blend the frozen peaches with 1.5 cups of sugar-free lemonade and 6 ounces of low-fat or nonfat yogurt for a refreshing, nutrient-packed drink.
Dessert Shortcut: Layer canned peaches with low-fat vanilla yogurt and granola for a quick and healthy parfait.
Tuna
A 3-ounce serving of canned tuna provides about 22 grams of protein—50% of the daily recommended intake for women and 40% for men. Tuna is also an excellent source of omega-3 fatty acids, which support heart and brain health.
Recipe Ideas
Tuna Pasta Toss: Drain a can of tuna and mix it with marinara sauce. Toss it with whole-grain pasta and a sprinkle of Parmesan cheese for a meal that helps you reach the USDA’s recommendation of 8 ounces of seafood per week.
Tuna Melt: Mix tuna with a dollop of Greek yogurt and some chopped celery. Spread on whole-grain bread, top with a slice of cheese, and toast until bubbly.
Green Beans
Canned green beans are a great source of fiber, vitamins A and C, potassium, and folate. These nutrients support overall health, including vision, immune function, and heart health.
Recipe Ideas
Veggie-Packed Meatloaf: Finely chop canned green beans and mix them into ground beef or turkey with breadcrumbs, egg, and seasoning for a nutrient-rich twist on classic meatloaf.
Quick Stir-Fry: Drain and rinse canned green beans. Stir-fry them with garlic, soy sauce, and sesame oil for a simple side dish.
Can-Do Tips for Meal Planning
Make the most of canned foods in your kitchen with these tips:
Stock up on canned ingredients year-round and buy fresh produce when it’s in season.
Check the center aisles of your grocery store for healthy canned options.
Store canned foods in a clean pantry, rotating new purchases to the back.
Use canned foods you already have on hand to whip up an impromptu meal.
Combine canned, fresh, frozen, and dried ingredients to create balanced meals.
With a little planning, canned foods can help you prepare quick, nutritious, and delicious meals for your family. For more recipes and inspiration, visit https://www.mealtime.org/recipe-index/.
For the right breast, lie on your right side with your baby facing you.
Pull your baby close. Your baby’s mouth should be level with your nipple.
In this position, you can cradle your baby’s back with your left arm and support yourself with your right arm and/or pillows.
Keep loose clothing and bedding away from your baby.
Reverse for the left breast.
This hold is useful when:
You had a C-section
You want to rest while baby feeds
You are breastfeeding in the middle of the night
You and your baby are comfortable in this position
Cross-Cradle Hold
For the right breast, use your left arm to hold your baby’s head at your right breast and baby’s body toward your left side. A pillow across your lap can help support your left arm.
Gently place your left hand behind your baby’s ears and neck, with your thumb and index finger behind each ear and your palm between baby’s shoulder blades. Turn your baby’s body toward yours so your tummies are touching.
Hold your breast as if you are squeezing a sandwich. To protect your back, avoid leaning down to your baby. Instead, bring your baby to you.
As your baby’s mouth opens, push gently with your left palm on baby’s head to help them latch on. Make sure you keep your fingers out of the way.
Reverse for the left breast.
This hold is useful when:
Your baby is premature
Your baby has a weak suck
Your baby needs help to stay latched
Your baby needs extra head support
You and your baby are comfortable in this position
Clutch or “Football” Hold
For the right breast, hold your baby level, facing up, at your right side.
Put your baby’s head near your right nipple and support their back and legs under your right arm.
Hold the base of your baby’s head with your right palm. A pillow underneath your right arm can help support your baby’s weight.
To protect your back, avoid leaning down to your baby. Bring baby to you instead.
Reverse for the left breast.
This hold is useful when:
You had a C-section
You have large breasts
You have flat or inverted nipples
You have a strong milk let-down
You are breastfeeding twins
Your baby likes to feed in an upright position
Your baby has reflux
You and your baby are comfortable in this position
Cradle Hold
For the right breast, cradle your baby with your right arm. Your baby will be on their left side across your lap, facing you at nipple level.
Your baby’s head will rest on your right forearm with your baby’s back along your inner arm and palm.
Turn your baby’s tummy toward your tummy. Your left hand is free to support your breast, if needed. Pillows can help support your arm and elbow.
To protect your back, avoid leaning down to your baby. Instead, bring your baby to you.
Reverse for the left breast.
This hold is useful when:
Your baby needs help latching on
You and your baby are comfortable in this position
Laid-Back Hold
Lean back on a pillow with your baby’s tummy touching yours and their head at breast level. Some moms find that sitting up nearly straight works well. Others prefer to lean back and lie almost flat.
You can place your baby’s cheek near your breast, or you may want to use one hand to hold your breast near your baby. It’s up to you and what you think feels best.
Your baby will naturally find your nipple, latch, and begin to suckle.
This hold is useful when:
Your baby is placed on your chest right after birth
You have a strong milk let-down
You have large breasts
You and your baby are comfortable in this position


Share this link via: