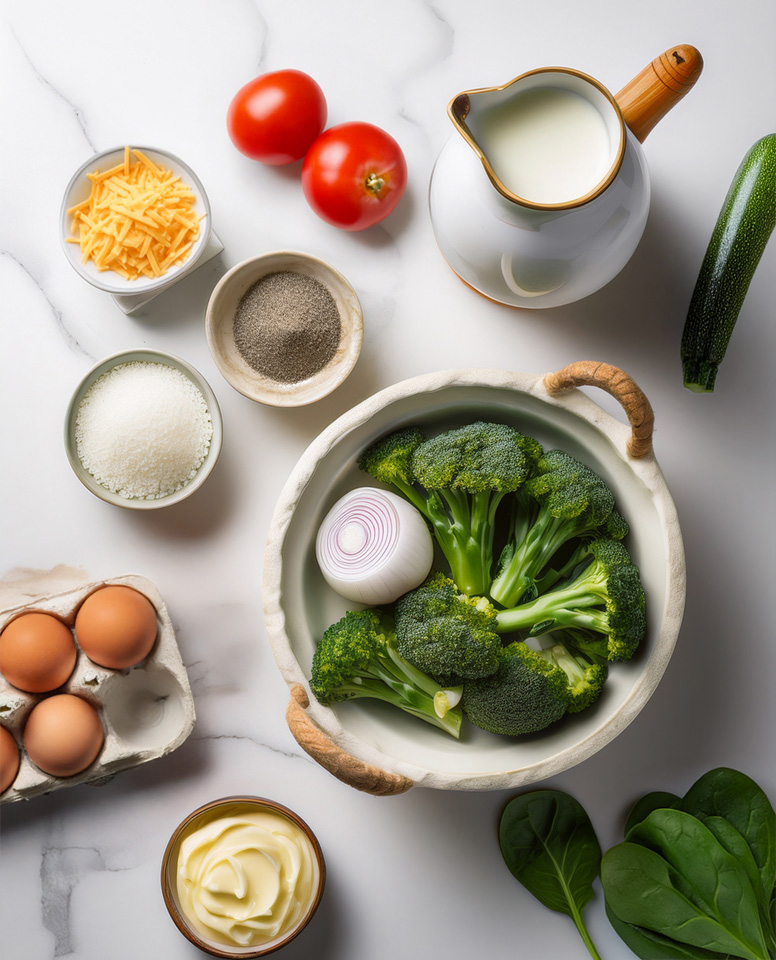
Skip to Content Skip to Footer
LiveWell WIC logo
Livewell Wic
  • Home
  • Ellyn Satter
    • Ellyn Satter
      Prenatal / Postpartum
    • Ellyn Satter
      Newborn / Infant
    • Ellyn Satter
      Older Baby / Almost Toddler
    • Ellyn Satter
      Toddler / Preschooler
  • Breastfeeding
  • Eat·Grow·Live Healthy
    • Eat·Grow·Live Healthy
      Women
    • Eat·Grow·Live Healthy
      Infants
    • Eat·Grow·Live Healthy
      Children
    • Eat·Grow·Live Healthy
      Fathers
  • Live Well Blog
  • Español
Extra-Vegetables-Quiche-bg

Extra Vegetables Quiche

  • Home
  • Live Well Blog
  • Extra Vegetables Quiche
December 10, 2025 Recipes

cheesy-egg-pie

Instructions  Colorful Quiche

Got leftover vegetables? Great!

Turn them into a cheesy egg pie with a caramelized onion crust. This colorful quiche is a great way to use up leftover vegetables while adding more vitamins, minerals, and fiber to your day. The eggs and cheese provide protein to help keep you full and energized, while the vegetables add nutrients that support heart and digestive health. It’s an easy, budget-friendly meal that tastes as good as it is good for you!

There are two ways to make this quiche.

If you have a cast-iron or other oven-proof skillet, you can make the quiche right in the skillet to cut down on dishes. Otherwise, start with a regular skillet and later transfer everything to a pie dish to bake.

Instructions Serving Ingredients

Servings: 4

  • 1 tablespoon butter
  • 1 large onion, sliced into half moons
  • 3-4 cups chopped vegetables – choose your favorites!
  • 8 large eggs
  • 1 cup milk
  • 1 cup cheddar cheese, grated
  • 1 teaspoons salt
  • 1/2 teaspoons black pepper
Tip!

Steam or cook vegetables like broccoli, cauliflower or winter squash before adding to the quiche to make sure they’ll be fully cooked. Any other quick-cooking vegetables, like tomatoes, zucchini, or spinach can just be used fresh – no need to pre-cook.

Ingredients-vegetables
Instructions  Food Instructions
Heat-kitchen-oven
1.

Set the oven to 400 F.

vegetables-instruction-two
2.

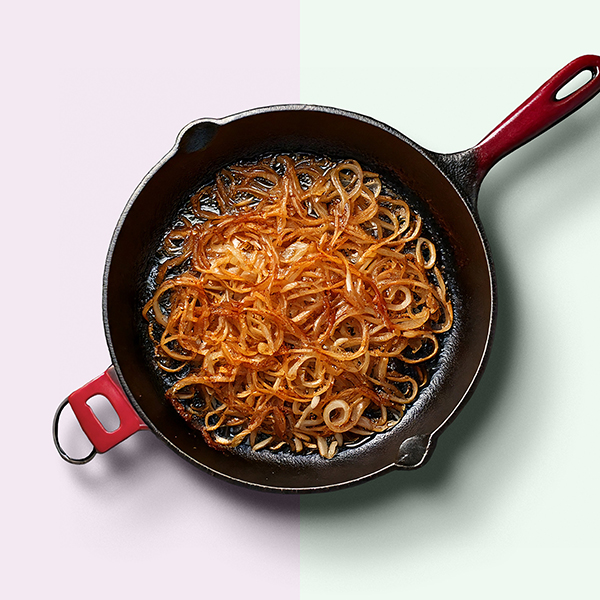
Melt the butter in a skillet over medium heat. Add your onion slices and sprinkle a bit of salt and pepper over them. Cook the onions until they are golden brown and starting to caramelize. If your pan is oven-proof, simply remove it from the heat and spread the onions evenly across the bottom. Otherwise, butter a pie dish and scoop the onions into it, creating an even layer on the bottom. The onions add a crust-like texture and a bit of crunch.

vegetables-instruction-three
3.

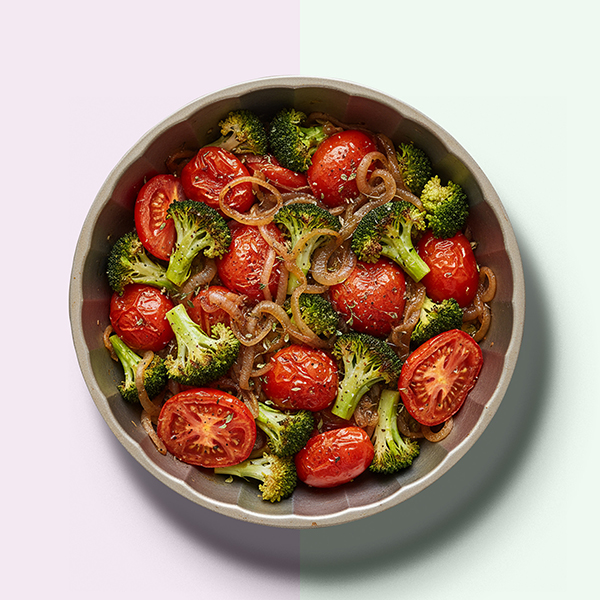
Spread the vegetables evenly over top of the onions. The dish or pan should look fairly full.

4.

In a mixing bowl, use a fork to lightly beat the eggs with the milk, cheese, salt, and pepper, just enough to break up the yolks and whites. Pour the mixture over the vegetables and onions.

5.

Bake the quiche in the oven for 1 hour, or until the surface is lightly brown all the way across.

6.

Remove from oven and let the quiche cool for about 20 minutes, then slice into wedges and serve.

REFERENCES:

Adapted from Leanne Brown. Vegetable Quiche, Hold the Crust. (October 2025).
https://leannebrown.com/vegetable-quiche-hold-the-crust/

You May Also Like...

February 18, 2026

Heart-Healthy Recipe: Banana Berry Oatmeal Cups

Banana Berry Oatmeal Cups February is all about showing your heart some love! One tasty way to do that is by eating foods that help your heart stay strong, like…

Read More
2
December 31, 2025

Is the Chia Seed Challenge Worth It?

Is the Chia Seed Challenge Worth It? If you’ve spent time on TikTok or Instagram, you may have seen people trying the 30-day chia seed challenge. It’s gotten a lot…

Read More
2
October 1, 2025

Easy Pumpkin Muffins

It’s Pumpkin Season! Rich in Vitamin A (from beta-carotene), pumpkin helps support healthy vision and immune function. It’s also a good source of fiber, which helps with digestion and can…

Read More
0
  • Infant
    • The Basics of Paced Bottle-Feeding
    • How Do I Know If My Baby Could Be Tongue-Tied?
    • Protect Your Baby from Cronobacter
    • Exploring the World with Baby – Sensory Play
    • Get Your Baby “Back” to Sleep in a Safe Environment
  • Children
    • Shopping With Kids: A Simple Way to Help Them Like More Foods
    • Pumpkin Fun: Free and Healthy Activities for Kids Under 5
    • Letting Your Child Play with Food Can Be a Good Thing
    • Is Snack Time Treat Time?
    • Fun Ways to Learn About Healthy Food and Get Moving!
  • General /Family
    • The 2025-2030 Dietary Guidelines for Americans – What Families Need to Know
    • Finding Calm When Life Gets Busy: Stress-Management for Parents
    • February Is National Heart Month: Simple Ways to Show Your Heart Some Love
    • 10 Ways to Enjoy Avocados – And Helpful Tips to Feed with Confidence
    • Food, Feelings, and Finding Balance: Understanding Disordered Eating
  • Women
    • Newborn Hunger Cues: How to Know When Your Baby Is Hungry or Full
    • How to Know Your Baby Is Getting Enough Breastmilk
    • Breastfeeding Through Growth Spurts and Sleep Changes
    • Baby Blues… or Is It Something More?
    • Gut Health and Gestational Diabetes
  • Recipes
    • Heart-Healthy Recipe: Banana Berry Oatmeal Cups
    • Is the Chia Seed Challenge Worth It?
    • Easy Pumpkin Muffins
    • Confetti Bean Salad
    • Creamy Cantaloupe Smoothie
LiveWell WIC program logo

    Contact Us

USDA is an equal opportunity provider, employer, and lender.

Cookie PolicyAbout UsPrivacy PolicyTerms of Agreement

© Brush Art Corporation

  • Email
  • SMS
If you are using multiple emails, separate them with commas.

    SMS Communication Consent

    Share

    Share this link via:

    Side Lying Hold

    Side-Lying Hold

    1. For the right breast, lie on your right side with your baby facing you.
    2. Pull your baby close. Your baby’s mouth should be level with your nipple.
    3. In this position, you can cradle your baby’s back with your left arm and support yourself with your right arm and/or pillows.
    4. Keep loose clothing and bedding away from your baby.
    5. Reverse for the left breast.

    This hold is useful when:

    • You had a C-section
    • You want to rest while baby feeds
    • You are breastfeeding in the middle of the night
    • You and your baby are comfortable in this position
    Wooden carved fork resting on the edge

    Cross-Cradle Hold

    1. For the right breast, use your left arm to hold your baby’s head at your right breast and baby’s body toward your left side. A pillow across your lap can help support your left arm.
    2. Gently place your left hand behind your baby’s ears and neck, with your thumb and index finger behind each ear and your palm between baby’s shoulder blades. Turn your baby’s body toward yours so your tummies are touching.
    3. Hold your breast as if you are squeezing a sandwich. To protect your back, avoid leaning down to your baby. Instead, bring your baby to you.
    4. As your baby’s mouth opens, push gently with your left palm on baby’s head to help them latch on. Make sure you keep your fingers out of the way.
    5. Reverse for the left breast.

    This hold is useful when:

    • Your baby is premature
    • Your baby has a weak suck
    • Your baby needs help to stay latched
    • Your baby needs extra head support
    • You and your baby are comfortable in this position
    Woman with shopping bag

    Clutch or “Football” Hold

    1. For the right breast, hold your baby level, facing up, at your right side.
    2. Put your baby’s head near your right nipple and support their back and legs under your right arm.
    3. Hold the base of your baby’s head with your right palm. A pillow underneath your right arm can help support your baby’s weight.
    4. To protect your back, avoid leaning down to your baby. Bring baby to you instead.
    5. Reverse for the left breast.

    This hold is useful when:

    • You had a C-section
    • You have large breasts
    • You have flat or inverted nipples
    • You have a strong milk let-down
    • You are breastfeeding twins
    • Your baby likes to feed in an upright position
    • Your baby has reflux
    • You and your baby are comfortable in this position
    Cartoon-style abstract bird silhouette

    Cradle Hold

    1. For the right breast, cradle your baby with your right arm. Your baby will be on their left side across your lap, facing you at nipple level.
    2. Your baby’s head will rest on your right forearm with your baby’s back along your inner arm and palm.
    3. Turn your baby’s tummy toward your tummy. Your left hand is free to support your breast, if needed. Pillows can help support your arm and elbow.
    4. To protect your back, avoid leaning down to your baby. Instead, bring your baby to you.
    5. Reverse for the left breast.

    This hold is useful when:

    • Your baby needs help latching on
    • You and your baby are comfortable in this position
    Abstract geometric shapes in pastel

    Laid-Back Hold

    1. Lean back on a pillow with your baby’s tummy touching yours and their head at breast level. Some moms find that sitting up nearly straight works well. Others prefer to lean back and lie almost flat.
    2. You can place your baby’s cheek near your breast, or you may want to use one hand to hold your breast near your baby. It’s up to you and what you think feels best.
    3. Your baby will naturally find your nipple, latch, and begin to suckle.

    This hold is useful when:

    • Your baby is placed on your chest right after birth
    • You have a strong milk let-down
    • You have large breasts
    • You and your baby are comfortable in this position