Skip to Content Skip to Footer
LiveWell WIC logo
Livewell Wic
  • Home
  • Ellyn Satter
    • Ellyn Satter
      Prenatal / Postpartum
    • Ellyn Satter
      Newborn / Infant
    • Ellyn Satter
      Older Baby / Almost Toddler
    • Ellyn Satter
      Toddler / Preschooler
  • Breastfeeding
  • Eat·Grow·Live Healthy
    • Eat·Grow·Live Healthy
      Women
    • Eat·Grow·Live Healthy
      Infants
    • Eat·Grow·Live Healthy
      Children
    • Eat·Grow·Live Healthy
      Fathers
  • Live Well Blog
  • Español
The Pre-Diabetes Diet Plan WIC

The Pre-Diabetes Diet Plan

  • Home
  • Live Well Blog
  • The Pre-Diabetes Diet Plan
July 30, 2025 Women

sofia's story Sofia’s Story
woman-at-doctors

Sofia wanted to have another baby.

But her doctor said she had pre-diabetes—and it could turn into diabetes if she didn’t make some changes.

She knew that because she had gestational diabetes (diabetes during pregnancy) when she had her son, this meant she had a higher chance of getting diabetes later in life.

Sofia didn’t give up—she got help and made a plan.
You can too! 

pre diabetes What Is Pre-Diabetes?

Pre-diabetes means your blood sugar is a little too high.

It’s not diabetes yet, but it can turn into diabetes if no action is taken.

Doctors use these numbers to check:

Fasting blood sugar: 100–125
Hemoglobin A1C: 5.7–6.4
If the numbers go higher, it’s called diabetes.
what can help What Can Help?

You can often reverse pre-diabetes with:

fruit-basket-icon
Healthy eating
shoose-icon
Regular exercise
time-icon
Losing weight

(if needed)

Sofia had a hard time losing baby weight. Her son was already 3 years old, and nothing had worked. So, she talked to her WIC nutritionist who shared these tips:

✓
Eat more vegetables.

Choose non-starchy ones like carrots, cabbage, green beans, and broccoli.

✓
Eat fewer starchy foods.

Cut back on potatoes, corn, white rice, and white bread. Choose whole grains instead.

✓
Skip fried and fatty foods.

Avoid things like chips, fast food, and packaged snacks.

✓
Cut back on sugar.

Drink water instead of soda or sweet drinks.

✓
Move more.

Try to get at least 30 minutes of activity most days. Walking, dancing, swimming, and playing outside all count!

✓
Eat slowly.

It takes 20 minutes for your brain to know you’re full!

✓
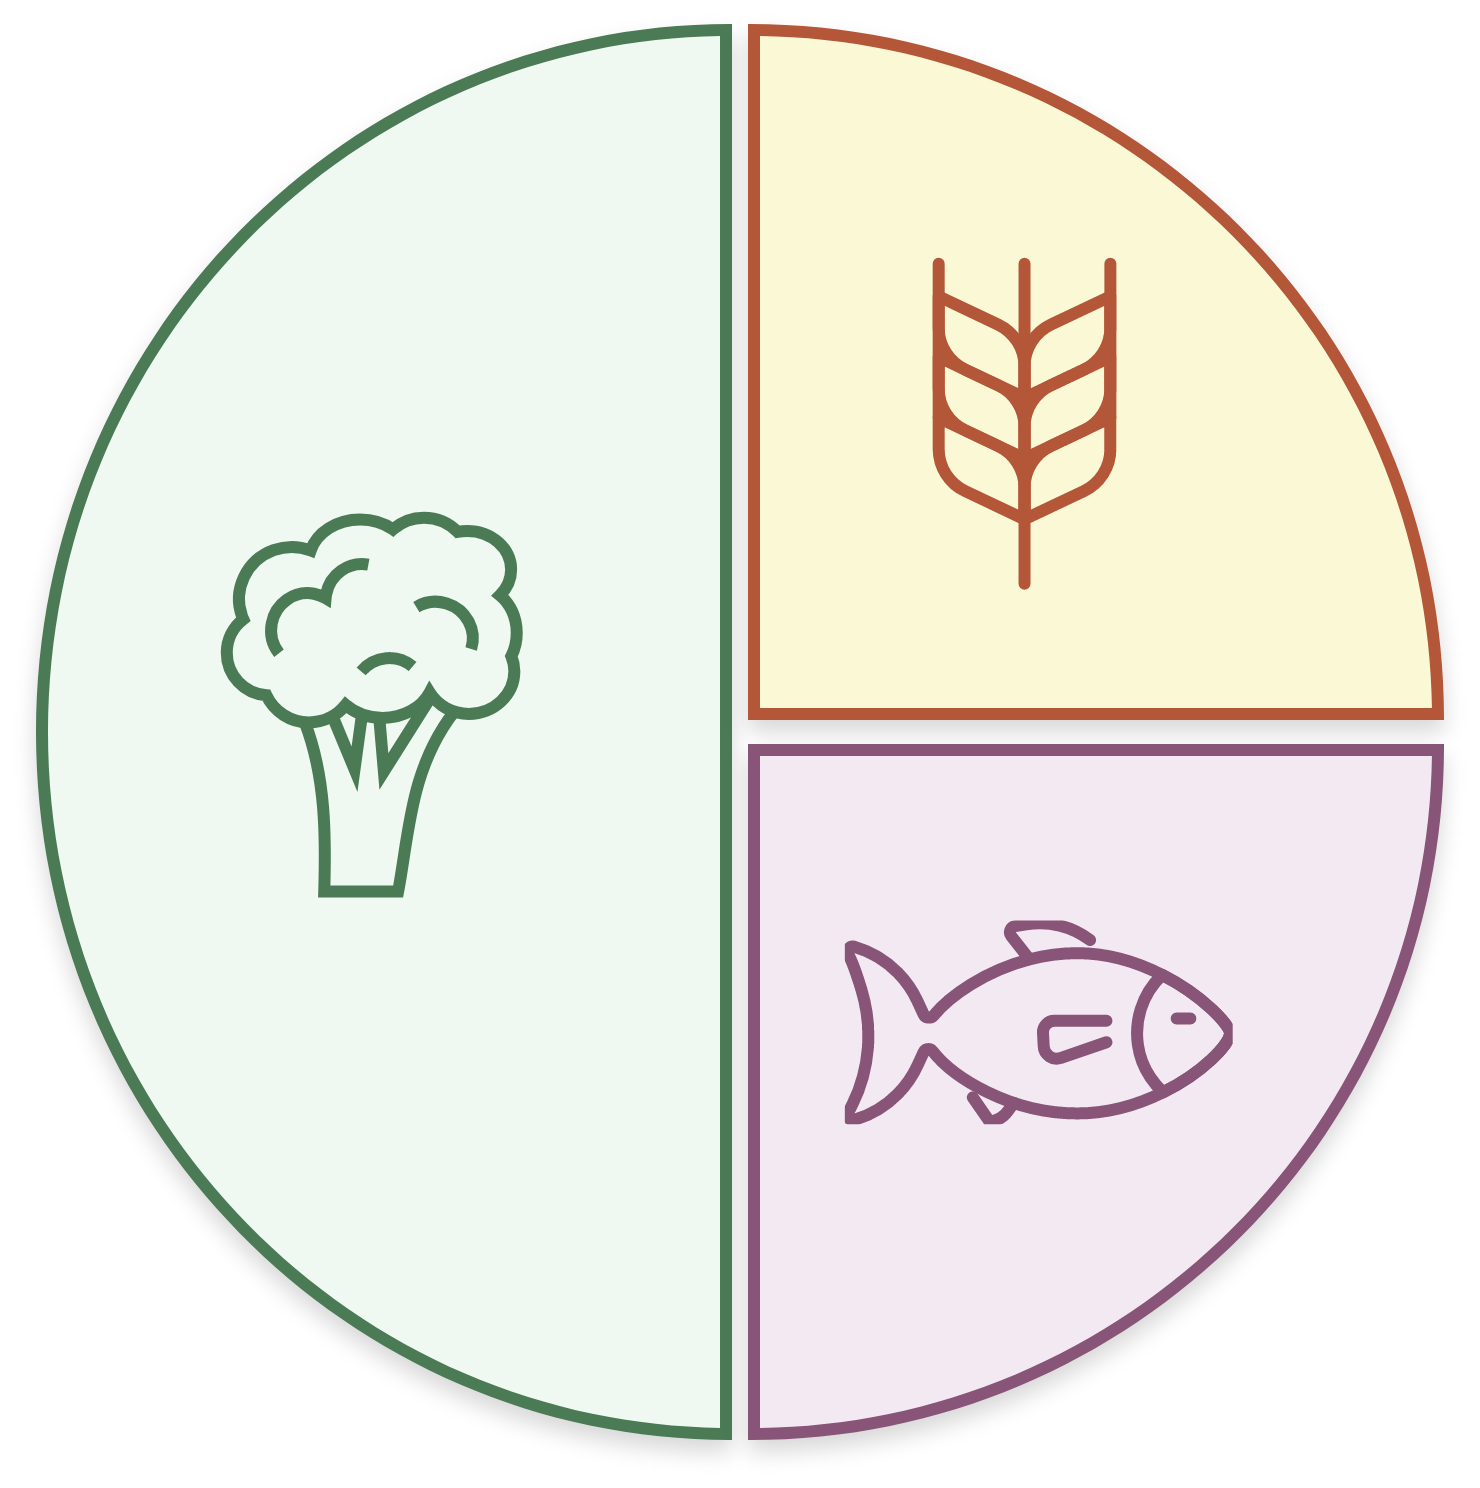
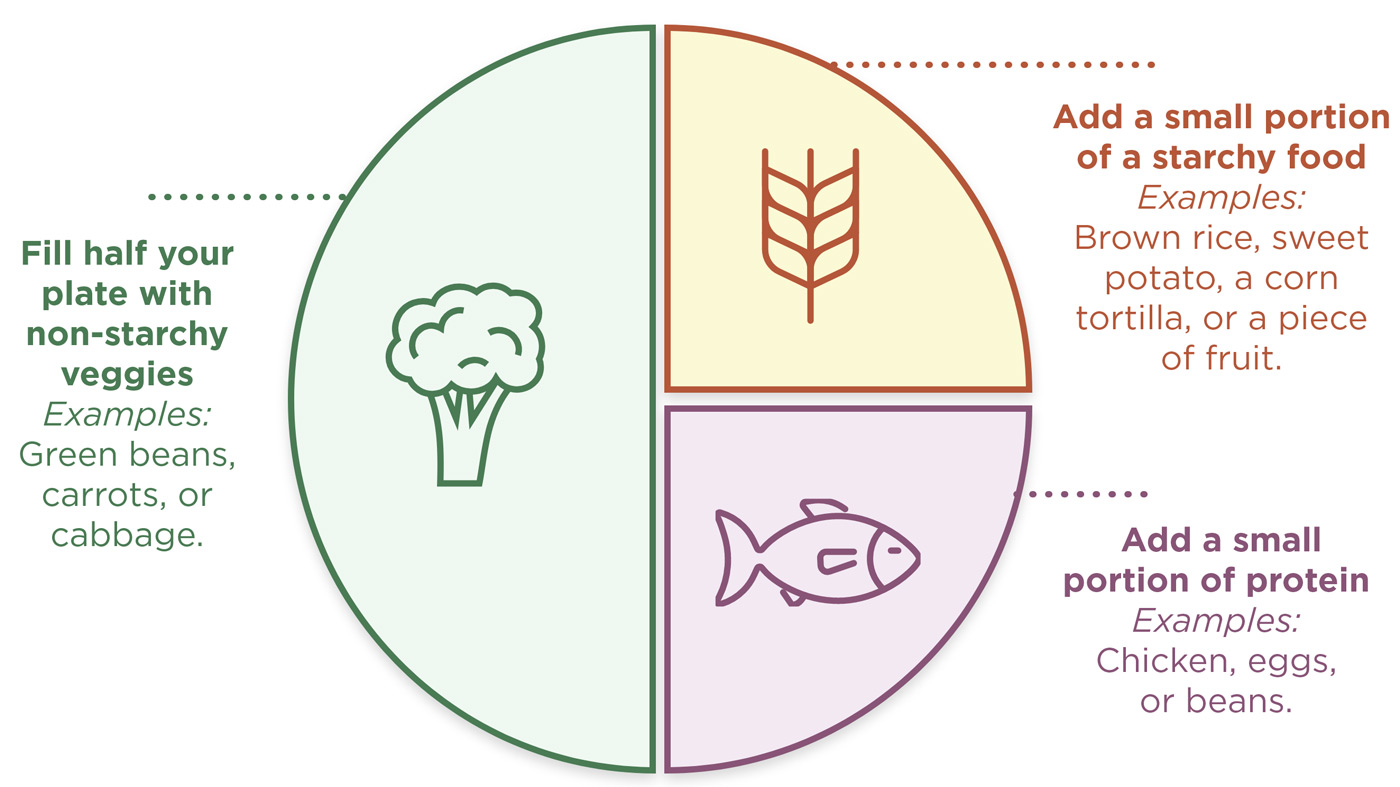
Use the plate method.

This way of eating is a lot like the Mediterranean Diet, which helps people stay healthy and feel full longer.

Use the plate method

Fill half your plate with non-starchy veggies
Examples:
Green beans, carrots, or cabbage.

Add a small portion of a starchy food
Examples:
Brown rice, sweet potato, a corn tortilla, or a piece of fruit.

Add a small portion of protein
Examples:
Chicken, eggs, or beans.

Plate Listing
glass-svg-icon
Add a glass of water or low-fat milk.
mom-with-son-in-park
Made it work How Sofia Made It Work

Sofia was busy—working part-time and chasing a toddler—but she made a plan.

Sofia made it work by:

  • Planning meals once a month, using veggies and whole grains. She cooked easy crock pot meals to use for leftovers. That left her two afternoons when she didn’t have to cook and could focus more on her exercise.
  • Exercising with her child. Five days a week they would walk together for at least 30 minutes at the park or inside the mall on rainy days. Sometimes, she did dance workouts at home.
  • Drinking more water. She brought a water bottle everywhere and kept healthy snacks—like fruit or string cheese—on hand.

Her Big Win Her Big Win

After 3 months, Sofia lost 15 pounds!
She felt more energy and could move easier. She didn’t breathe as heavily while walking and could bend down more easily to pick up toys. She was also proud to be a healthy role model for her son.

After 6 months, she had lost 27 pounds—and her blood sugar was back to normal!

Then, even more great news: she got pregnant again! She kept up her healthy habits, and when her doctor checked her blood sugar at 24 weeks, she did not have gestational diabetes! Sofia was proud of the positive changes she made—and you can be too.

Mom-and-Son-in-Park
Lern More Want to Learn More?

Check out these helpful resources:

  • Diabetes Plate Menus and Recipes – American Diabetes Association
  • Diabetes Meal Planning – Centers for Disease Control and Prevention
  • Lower-Calorie, Lower-Fat Swaps – National Heart, Lung, and Blood Institute
  • Eat Healthy, Spend Less – National Institutes of Health
  • Healthy Cooking and Snacking – National Heart, Lung, and Blood Institute
flower-print-svg

REFERENCES:

American Diabetes Association. Understanding diabetes diagnosis.
https://diabetes.org/about-diabetes/diagnosis

American Diabetes Association. Five things you should know about pre-diabetes.
https://diabetes.org/blog/five-things-you-should-know-about-prediabetes

Yale Medicine. Gestational diabetes: Symptoms, causes, treatments.
https://www.yalemedicine.org/conditions/gestational-diabetes-symptoms-causes-treatments#:~:text=Approximately%2010%25%20of%20pregnant%20women,over%20the%20past%2020%20years

Author: Bridget Swinney MS, RDN, LD

You May Also Like...

April 29, 2026

Pumping Basics & Safe Breast Milk Storage Guide

Welcoming a new baby comes with lots of learning moments, and for many families, pumping breast milk is one of them. Whether you’re pumping by choice, returning to work, managing…

Read More
1
April 15, 2026

Getting a Good Latch: Breastfeeding Positions & Holds That Help

Knowing when your baby is hungry, and when they are full, can help feeding feel easier and less stressful. Newborns usually eat 8 to 12 times each day, so learning…

Read More
2
March 25, 2026

Newborn Hunger Cues: How to Know When Your Baby Is Hungry or Full

Knowing when your baby is hungry, and when they are full, can help feeding feel easier and less stressful. Newborns usually eat 8 to 12 times each day, so learning…

Read More
1
  • Infant
    • When to Start Peanut and Egg to Help Prevent Allergies
    • The Basics of Paced Bottle-Feeding
    • How Do I Know If My Baby Could Be Tongue-Tied?
    • Protect Your Baby from Cronobacter
    • Exploring the World with Baby – Sensory Play
  • Children
    • Shopping With Kids: A Simple Way to Help Them Like More Foods
    • Pumpkin Fun: Free and Healthy Activities for Kids Under 5
    • Letting Your Child Play with Food Can Be a Good Thing
    • Is Snack Time Treat Time?
    • Fun Ways to Learn About Healthy Food and Get Moving!
  • General /Family
    • Avoiding Food Waste
    • The 2025-2030 Dietary Guidelines for Americans – What Families Need to Know
    • Finding Calm When Life Gets Busy: Stress-Management for Parents
    • February Is National Heart Month: Simple Ways to Show Your Heart Some Love
    • 10 Ways to Enjoy Avocados – And Helpful Tips to Feed with Confidence
  • Women
    • Pumping Basics & Safe Breast Milk Storage Guide
    • Getting a Good Latch: Breastfeeding Positions & Holds That Help
    • Newborn Hunger Cues: How to Know When Your Baby Is Hungry or Full
    • How to Know Your Baby Is Getting Enough Breastmilk
    • Breastfeeding Through Growth Spurts and Sleep Changes
  • Recipes
    • Fresh & Easy Spring Snacks for Toddlers
    • Fresh & Easy Spring Veggie Pasta
    • Heart-Healthy Recipe: Banana Berry Oatmeal Cups
    • Is the Chia Seed Challenge Worth It?
    • Extra Vegetables Quiche
LiveWell WIC program logo

Contact Us

USDA is an equal opportunity provider, employer, and lender.

Cookie PolicyAbout UsPrivacy PolicyTerms of Agreement

© Brush Art Corporation

  • Email
  • SMS
If you are using multiple emails, separate them with commas.

    SMS Communication Consent

    Share

    Share this link via:

    Cartoon vegetables with leafy tops gather playfully together.

    Side-Lying Hold

    1. For the right breast, lie on your right side with your baby facing you.
    2. Pull your baby close. Your baby’s mouth should be level with your nipple.
    3. In this position, you can cradle your baby’s back with your left arm and support yourself with your right arm and/or pillows.
    4. Keep loose clothing and bedding away from your baby.
    5. Reverse for the left breast.

    This hold is useful when:

    • You had a C-section
    • You want to rest while baby feeds
    • You are breastfeeding in the middle of the night
    • You and your baby are comfortable in this position
    Yellow circle with abstract, jagged shapes and patterns.

    Cross-Cradle Hold

    1. For the right breast, use your left arm to hold your baby’s head at your right breast and baby’s body toward your left side. A pillow across your lap can help support your left arm.
    2. Gently place your left hand behind your baby’s ears and neck, with your thumb and index finger behind each ear and your palm between baby’s shoulder blades. Turn your baby’s body toward yours so your tummies are touching.
    3. Hold your breast as if you are squeezing a sandwich. To protect your back, avoid leaning down to your baby. Instead, bring your baby to you.
    4. As your baby’s mouth opens, push gently with your left palm on baby’s head to help them latch on. Make sure you keep your fingers out of the way.
    5. Reverse for the left breast.

    This hold is useful when:

    • Your baby is premature
    • Your baby has a weak suck
    • Your baby needs help to stay latched
    • Your baby needs extra head support
    • You and your baby are comfortable in this position
    Cat playing with butterfly in a garden.

    Clutch or “Football” Hold

    1. For the right breast, hold your baby level, facing up, at your right side.
    2. Put your baby’s head near your right nipple and support their back and legs under your right arm.
    3. Hold the base of your baby’s head with your right palm. A pillow underneath your right arm can help support your baby’s weight.
    4. To protect your back, avoid leaning down to your baby. Bring baby to you instead.
    5. Reverse for the left breast.

    This hold is useful when:

    • You had a C-section
    • You have large breasts
    • You have flat or inverted nipples
    • You have a strong milk let-down
    • You are breastfeeding twins
    • Your baby likes to feed in an upright position
    • Your baby has reflux
    • You and your baby are comfortable in this position
    Peach circle with abstract shapes radiating outward.

    Cradle Hold

    1. For the right breast, cradle your baby with your right arm. Your baby will be on their left side across your lap, facing you at nipple level.
    2. Your baby’s head will rest on your right forearm with your baby’s back along your inner arm and palm.
    3. Turn your baby’s tummy toward your tummy. Your left hand is free to support your breast, if needed. Pillows can help support your arm and elbow.
    4. To protect your back, avoid leaning down to your baby. Instead, bring your baby to you.
    5. Reverse for the left breast.

    This hold is useful when:

    • Your baby needs help latching on
    • You and your baby are comfortable in this position
    Smiling peach character waving cheerful hello.

    Laid-Back Hold

    1. Lean back on a pillow with your baby’s tummy touching yours and their head at breast level. Some moms find that sitting up nearly straight works well. Others prefer to lean back and lie almost flat.
    2. You can place your baby’s cheek near your breast, or you may want to use one hand to hold your breast near your baby. It’s up to you and what you think feels best.
    3. Your baby will naturally find your nipple, latch, and begin to suckle.

    This hold is useful when:

    • Your baby is placed on your chest right after birth
    • You have a strong milk let-down
    • You have large breasts
    • You and your baby are comfortable in this position